Edit: I managed to secure all gold challenge modes as a Discipline Priest. I’ve updated this post to reflect on my experiences. I assume you already know most of the basics about playing a discipline priest like what the spells do and rotations and such.
The first time I signed on for a challenge mode, it took us almost 3 hours to get through Shado-Pan Monastary. We were bored on a Friday night and decided to give the challenge mode daily a shot thinking we’d be able to plow through it.
Yeah, we got a rude awakening.
Seriously, if you plan to go for a podium ranking, treat it with a raid mentality.
What does your class bring to challenge modes?
Imagine this.
Your GM has issued a challenge to your guild. He wants to assemble a Challenge mode roster. He doesn’t want to just challenge for the gold. He wants to be the best time on server. The game has 11 classes and 33 specs combined. Your job is to convince your GM why your class and spec is the right one for that roster slot.
The smart money is to include a Discipline Priest on that roster. You can make cases for the other healers, but a Disc Priest offers a ton of flexibility and power. They can chip in DPS while preventing incoming damage. Power Word: Barrier helps your party gets through the worst situations. Hymn of Hope spares you from having to drink (at the cost of seconds).
Talents
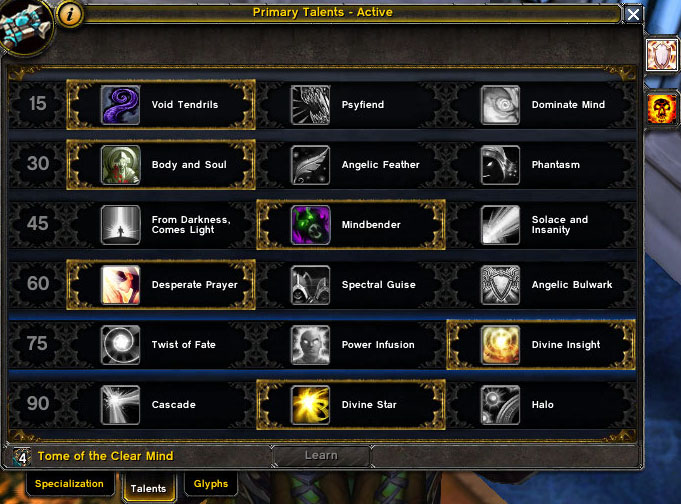
Previously, I explored talents based on their raid viability and what’s best for encounters. Evaluating them for challenge modes is a little different because now I have to think about aspects I’d normally dismiss in raids like crowd control.
Void Tendrils: Void Tendrils is a great massive crowd control ability. It’ll hold enemies in place while the rest of your party unleashes DPS. If your tank pulls a large amount of mobs and has a sizeable amount of threat, you can wade in and drop roots before withdrawing. The mobs will still want to crush the tank but won’t be able to until the tendrils expire. I’ve used Void Tendrils in key areas of Gate of the Setting Sun and Mogushan Palace to freeze mobs in place while we zipped by them. Diving onto an elevator with mobs frozen in place while the elevator is moving causes them to reset.
Body and Soul: You’ll be using shields often enough. Layering your party with speed boosts during areas with little to no resistance will help you with your time trial.
Mindbender: 5.2 introduced a new talent called Solace and Insanity. I feel that it’s a greater benefit for Shadow instead of Discipline. Mindbender’s the talent of choice in raids for the mana regen and the same is true for challenge mode.
Desperate Prayer: A self-heal on demand! This is your own emergency heal as a last ditch effort.
Divine Insight: You can make strong arguments for Divine Insight or Power Infusion. By default, I recommend Divine Insight because of that Prayer of Mending proc free Shield which has saved me a few times. You can make the case for Power Infusion and Twist of Fate depending on which challenge mode dungeon you’re pursuing. Longer ones like Scarlet Monastary might benefit from Power Infusion and I gave Twist of Fate a try for the extra healing boost (remember it triggers off of damage or healing).
Divine Star: The fact that you’re contemplating challenge modes means that you’re not an idiot and that you know how to aim Divine Star in such a way that you won’t pull. It’ll do some light damage to your enemies and heal your party (provided they’re fairly grouped up). Cascade is your secondary option in the event Divine Star does not work out in your challenge mode instance.
Glyphs
Penance: You’ll absolutely need this while healing on the move.
Power Word: Shield: Signature spells for priests and that extra healing’s going to help when your party members have taken damage.
Prayer of Mending: Most Prayer of Mending bounces will not bounce 5 times. The first one is usually the one that matters.
The above three glyphs are the main ones I used.
Psychic Scream: In the event extra CC is needed, you can fire this off and have your team focus one down fast before the fear effect expires.
Smite: Increases the damage on Smite on Holy Fire’d targets (and conversely the healing from Atonement). You can substitute this for the Shield glyph once your group has practiced it enough.
Playstyle
Those of you with a progression oriented raiding mentality will excel here. If you put in that level of focus you do in raids towards 5-mans, then golds will easily be within reach. But if you approach challenge modes casually without bothering to look up strategy or practicing certain aspects, then you’ll be lucky if you even complete the instance.
Reforging your stats
I reforged out of Spirit until I had around 8000. I placed the points into haste, but your mileage is going to vary based on your group composition. If you have a Druid in your party, they can feed you Innervate. You should always be using Mindbender and Hymn of Hope whenever you get a chance (and if you’re low). Expect to cast interrupt your own spellcasts often as you react fluidly (or when Penance becomes available). I kept my raid gear as is. I never had to change out gems as reforging gets you most of the way there.
Don’t worry about hit or anything. You’ll automatically have 15% in Discipline.
Consumables
You use consumables for raids. But challenge modes might call for some extra stuff that you normally wouldn’t consider packing.
- Drums of Forgotten Kings: If no one in the group can cast the buff, at least you’ll have a way to obtain it.
- Potion of Focus: Comes in handy in case you die in combat and get a combat resurrect. Useful if your group is chain pulling and you need mana but can’t spare the seconds to sit down and drink.
- Potion of the Jade Serpent: For the early boss encounters where you get a chance to use a pre-pot, use this.
- Flask of Falling Leaves: You can reforge out of Spirit into other beneficial stats and use this flask to compensate …
- Flask of the Warm Sun: … Or just get a straight Intellect boost instead. I recommend this.
- Golden Carp Consomme: Keep multiple stacks in your bag. You’ll be chugging this for mana every moment you get in between pulls.
- Mogu Fish Stew: As long as you get an Intellect boost, you’ll be okay. I doubt 50 Intellect is going to be the breaking factor between a silver and a gold earning anyway.
- Invisibility Potion: Certain challenge mode gold runs require this.
Mana regen
If you see an opportunity to chow down on Golden Carps, do it. If more time is needed, tell your party to hold a moment until you drop combat, then start drinking while they pull. Get used to healing with anywhere from 25 to 50% mana. It’s not uncommon to go through 20+ Golden Carps in a run. Boss fights don’t last that long (they can’t, or else you won’t make gold). Your job is to keep your group alive just long enough that they can bring down enemies and you don’t need full mana to do this.
Actual healing
During periods of light damage, you can safely rely on Atonement to maintain the tank’s health. Your group should be adept at avoiding projectiles and assorted spells. In most cases, they shouldn’t take much avoidable damage. Your Smite and Holy Fire spam will be enough on the easier trash to help counteract some of the damage coming in and you’ll be adding your own DPS to help get past them quicker onto the harder stuff. Plus you’re setting yourself up for Archangel’s bost to healing as you dive into the more challenging pulls.
As you’re moving from trash pack to trash pack, remember the spells you can use while moving:
Ideally, you don’t want to use the last two spells. If they’re not being saved for anything, it’ll give you a little breather as you heal through those monster trash pulls that your tank manages to get. Keep your shields up on the tanks at all times. If you’re against AoE packs or anything hitting the DPS, make sure they’re shielded too. Prayer of Mending is always on cooldown. Penance should also be always on cooldown (and it can be used either defensively or offensively).
What they teach you in Discipline school is that Renew is inefficient.
That it is terrible.
That Power Word: Shield is better.
But it is one of the few healing spells you have that is both instant and not on a cooldown timer. You need every ounce of healing even if it means having to be inefficient. Your Golden Carps will help with your mana. Given the choice between being inefficient or restarting a gold run, I’d pick the former.
Group healing is fairly straight forward. Prayer of Healing is your go to. Use Penance and shields to target specific players who are lower than the rest. Use that Spirit Shell when your group is between half to full. If they’re any lower, they run a risk of being instantly killed (depending on the trash packs or boss, but don’t take chances).
When you square off against bosses, use a pre-pot if you’re allowed to (in some cases, you can’t because of the Invisibility potion cooldown). Load up on Holy Fire and Smite to build up the Archangel stacks before burning it for the incoming tons of damage that bosses eventually ramp up to.
Cooldown use is going to vary. Your Barrier can be used for certain pulls. A skill you and your team needs to learn how to do is chaining cooldowns which can neutralize the incoming damage from an enemy. For example, my group had our Monk open with a Leg Sweep (5 seconds). Our shaman followed up with a Capacitor Totem (5 seconds). Our Death Knight tank used Remorseless Winter (6 seconds). I applied Power Word: Barrier at the end (10 seconds). That’s over 20 seconds of reduced (or zero) incoming damage giving your group free reign to AoE or kill selected mobs. DPS them if you notice stunned mobs!
Final word: Regardless of what group composition you use, practice the run first. There are many videos on Youtube with walkthroughs for each instance. Pick one that your group wants to work on and make sure everyone watches the video. Watch how it flows. Observe which trash packs are skipped or when Invisibility potions are used. Look at things like positioning of where the tank and the rest of the players are. After that, do dry runs of the instance without using feasts or flasks. Keep doing them until you get an idea of which trash to kill and the overall pacing of the instance. Once you’re ready for the gold run, use the consumables to give you that extra edge.
Be like Allen Iverson and practice!
For more, check out my challenge mode walkthroughs!